Solved – Alternate Key not getting created on solution import in Dynamics 365


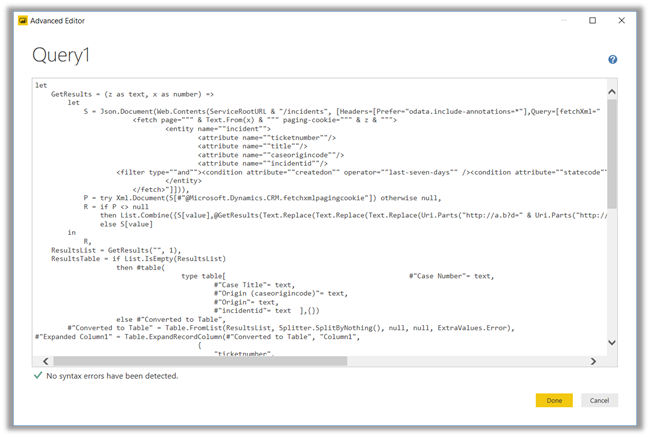
Recently, we moved our Solution from Development to Test. Then on running one of the SSIS Packages we got the below error

The specified key attributes are not a defined key for the entity [4] CRM service call returned an error:

On opening the Entity for customization, and checking for the key, we saw that it was in the Status Pending.

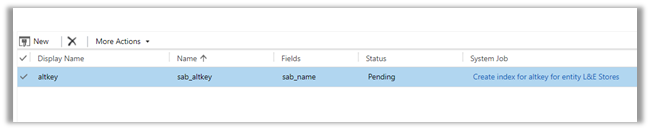
On opening the system job, there was no detail for the error.

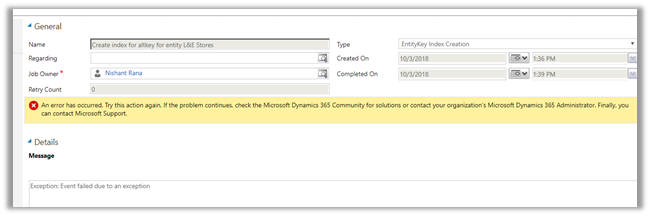
We normally get this error, if there are records already available that have duplicate values for that alternate key field. However, in this case, there we no record as this entity was being moved first time in the Test.

Well to just fix this we thought of manually reactivating the key

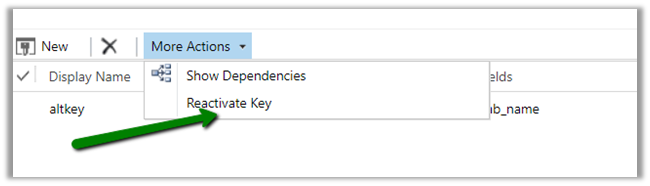
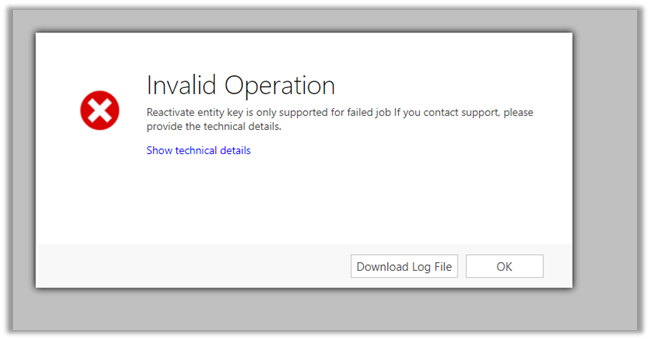
However, that threw a new error that “Reactivate entity key is only supported for failed job.”

To fix this go to Settings à System Jobs à search for the failed system job and delete them

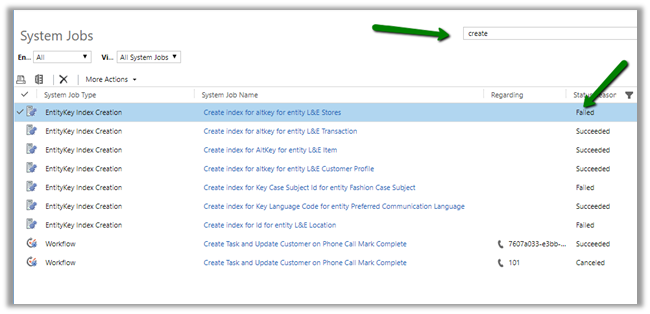
Now we will see the status as Failed

This time it will allow running the reactivation.

Finally,

Hope it helps..

Advertisements

Creating Power BI Report using Power Query (M) Builder plugin of XrmToolBox


Power Query(M) Builder XrmToolBox Plugin developed by Ulrik Carlsson and Mohamed Rasheed makes it very easy to develop Power BI Reports targeting Dynamics 365 CE.

Just listing down the basic steps below for quick reference à

Install the Power Query (M) Builder plugin from XrmToolBox

Click on Load Entities and select the Entity against which we want to write the report. Here we will be writing a report against Case entity (for e.g. Cases by Origin), so let us select the Case entity. For selecting the fields either we can make use of view or search and add the corresponding fields in Selected Fields Section.

Here we have selected the following 3 fields

Click on Update FetchXML button.

This opens the FetchXML tab, where we can select the fields (note we have formatted value field added for Origin OptionSet field) and also select to add record URL or to use all the attributes of the entity.

Here we have selected all the fields and also checked the option “Add Record URL”.

Click on Generate FetchXML, to generate the query.

The generated main query

Now back in Power BI Desktop, open the query editor and create a new blank query with following name and value

Dyn365CEBaseURL https://[org].crm.dynamics.com i.e. URL of the CRM Organization.

We can use the Generate Service URLs button to get this URL from within the plugin.

Similarly create a new blank query as

Get the value from the ServiceRoolURL tab from within the plugin.

Create one more Blank Query and click on Advanced Editor and copy the main query generated earlier and paste it.

Click on Done.

We can see the result generated for us in the Query Editor window

Click on Close and Apply

Back in report editor select the fields or any other visualizations to create the report

To format the URL, select the Link field and go to Modelling tab and in Data Category select Web URL to enable the links.

Thus, we are done with our report. Next steps would be to publish them, add them in dashboard, Embed them within Dynamics CE, Refresh them etc..

Hope it helps..

Using KingswaySoft’s CDS/CRM Source component to get Audit information in Dynamics 365 CE (SSIS)


Kingsway’s CDS/CRM Source component and has Source Type property having an AuditLogs value that can be used to get the Audit details from Dynamics 365 CE.

Below we have set the Source Type as AuditLogs in the CDS/CRM Source Component Editor and provided the FetchXML for the entity for which we would like to retrieve the audit information.

To get all the audit records, we can run it against Audit entity.

For AuditLogs source type there are 3 types of output:

  1. Audit Details (Attribute Changes) – Contains field level changes.

  1. Audit Details (Relationship Changes) – Contains relationship changes.

  1. Primary Output – Contains entity level audit information.

Hope it helps..

D365 V9{Upgrade}: Client API Change for openEntityForm


Ajit Patra's avatarAjit Patra

Prior to D365 V9, we were using Xrm.Utility.openEntityForm() to open an existing record or to open a create form of an entity providing some additional parameters. However, in D365 V9 as it has been deprecated, we need to use Xrm.Navigation.openForm() to perform the same operation.

Here’s an example of the change in API along with it’s parameters.
D365 V8:


D365 V9:

While creating a new record, we can pass values to the attributes using an object which is optional. Please see below sample:

Hope it helps!!

View original post

Upgrade to new Xrm client API object model (v9) smoothly using XrmToolBox plugins


We are currently in process of upgrading Dynamics from version 8.2 to 9.0. One of the major change is updating our current JavaScript to the new Xrm Client API Object Model.

https://docs.microsoft.com/en-us/dynamics365/get-started/whats-new/customer-engagement/important-changes-coming#some-client-apis-are-deprecated

https://docs.microsoft.com/en-us/dynamics365/customer-engagement/developer/clientapi/understand-clientapi-object-model

Below are the most useful tools à

Install the plugin, connect to your organization and click on Retrieve Jscript Webresources, it will list all the JScript Web resources found.

Click on Scan

It will list down all the issues found.

One common change that we need to do across all our JScript is to pass the ExecutionContext from Form as well as Fields (and Ribbon) events. Script Finder makes it extremely easy to find them out.

Click on Find Scripts usage and it will generate a report with all the details as shown below

Now we can follow the generated report and directly make the change to the form, field, and ribbon instead of searching for it manually.

Happy Upgrading !!

D365 V9{Upgrade}: Ribbon button changes


V9 Ribbon Changes

Ajit Patra's avatarAjit Patra

If we have custom Ribbon button and custom JS code to perform some action on click of it or to simply display/hide Ribbon button based on some condition in JS code in version prior to D365 V9, then following changes need to be done to make them work in D365 V9.

  1. Using Ribbon Workbench, add a new parameter to the command/enable rule/display rule of type CRM Parameter:aa
  2. Select the value of CRM Parameter as PrimaryControl:bb
  3. After making above changes Click on Publish.cc
  4. Then coming to JS code, pass executionContext as parameter to the method used in command/enable rule/display rule.dd

NOTE: Here, we talked about only ribbon button related changes wrt D365 V9. Other client API changes still need to be done as part of upgrade activities as mentioned here.

Hope it helps!!

View original post