Few key points about query acceleration –
Query acceleration supports ANSI SQL like language, to retrieve only the required subset of the data from the storage account, reducing network latency and compute cost.
Query acceleration requests can process only one file, thus joins and group by aggregates aren’t supported.
Query acceleration supports both Data Lake Storage (with hierarchical namespace enabled) and blobs in the storage account.
Query acceleration supports CSV and JSON formatted data as input.

Let us take a simple example to see it in action.
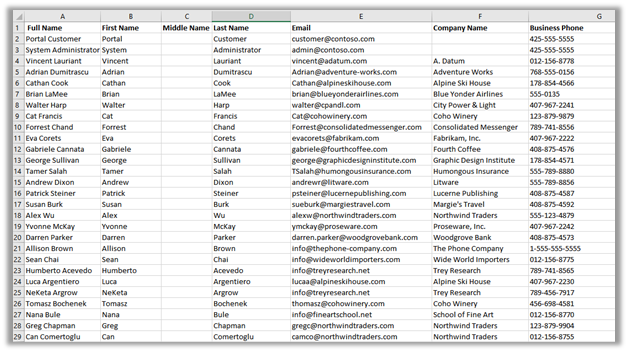
Within mydatalakegen (StorageV2 (general purpose v2)), we have All Contacts.csv with the mycrmcontainer.

Open the Windows PowerShell command window
Sign in to Azure subscription
Register the query acceleration feature
- Register-AzProviderFeature -ProviderNamespace Microsoft.Storage -FeatureName BlobQuery
Register the resource provider
- Register-AzResourceProvider -ProviderNamespace ‘Microsoft.Storage’
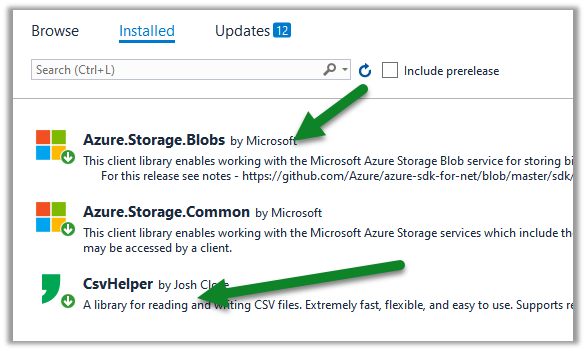
Create a console application project in Visual Studio and add the following NuGet Packages
Sample Code –
</pre>

using System;
using System.Globalization;
using System.IO;
using Azure.Storage.Blobs;
using Azure.Storage.Blobs.Models;
using Azure.Storage.Blobs.Specialized;
using CsvHelper;
using CsvHelper.Configuration;

namespace MyQuery
{
class Program
{
static void Main(string[] args)
{

// Initialize the BlockBlobClient
BlockBlobClient myBlobClient = new BlockBlobClient(connectionString: "DefaultEndpointsProtocol=https;AccountName=mydatalakegen;AccountKey=orc8e1Dpclu5P3Ox9PIlsLG2/x8KZLcmgyhOEgz6yFTmzFJty+EpHQ==;EndpointSuffix=core.windows.net",
containerName: "mycrmcontainer", blobName: "All Contacts.csv");

// Define the query
// First Name - space in the column header
// _4 - referring the 4th column in the csv file
// LIMIT - limit to first 10 records
string query = @"SELECT ""First Name"", _4, email FROM BlobStorage LIMIT 10";

var blobQueryOptions = new BlobQueryOptions();
blobQueryOptions.InputTextConfiguration = new BlobQueryCsvTextOptions() { HasHeaders = true };

var result = myBlobClient.Query(query, blobQueryOptions);
var reader = new StreamReader(result.Value.Content);

var parser = new CsvReader(reader, new CsvConfiguration(CultureInfo.CurrentCulture) { HasHeaderRecord = true });

while(parser.Read())
{
Console.Out.WriteLine(String.Join(" ", parser.Context.Record));
}

Console.ReadLine();
}
}
}
<pre>
Output –

Get all the details here –
https://docs.microsoft.com/en-us/azure/storage/blobs/query-acceleration-sql-reference
https://docs.microsoft.com/en-us/azure/storage/blobs/data-lake-storage-query-acceleration
https://docs.microsoft.com/en-us/azure/storage/blobs/data-lake-storage-query-acceleration-how-to?tabs=azure-powershell%2Cpowershell
Posts on Azure Data Lake
Hope it helps..