Scribe Insight Limitation – XML Source doesn’t support repeating sibling nodes


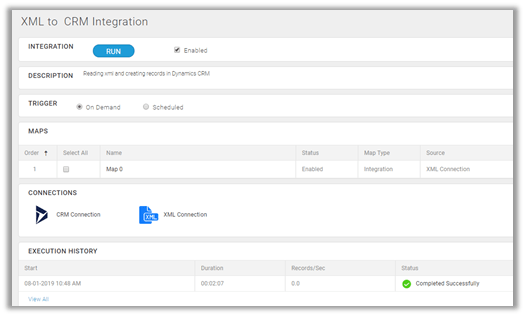
Recently we were evaluating Scribe Insight as our Integration tool for one of our clients. The requirement was to read an xml and create records in Dynamics 365 CE.

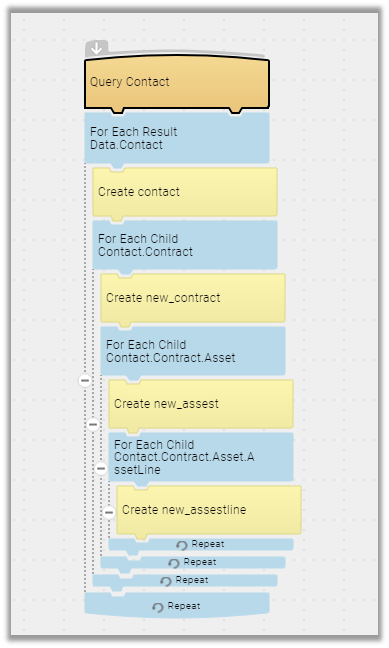
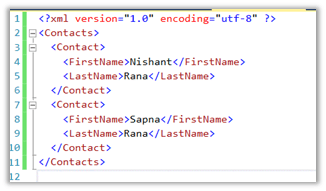
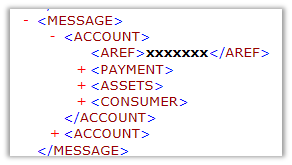
The basic structure was something like below, with Account as the parent tag and Payment, Assets, Consumer as repeating child nodes of Account i.e. 1 – n.

However, to our surprise when we started defining the same structure in the XML Component within Scribe Workbench we got the below error message à
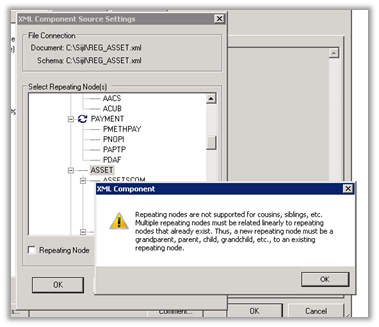
—————————

XML Component

—————————

Repeating nodes are not supported for cousins, siblings, etc. Multiple repeating nodes must be related linearly to repeating nodes that already exist. Thus, a new repeating node must be a grandparent, parent, child, grandchild, etc., to an existing repeating node.

—————————

OK

—————————

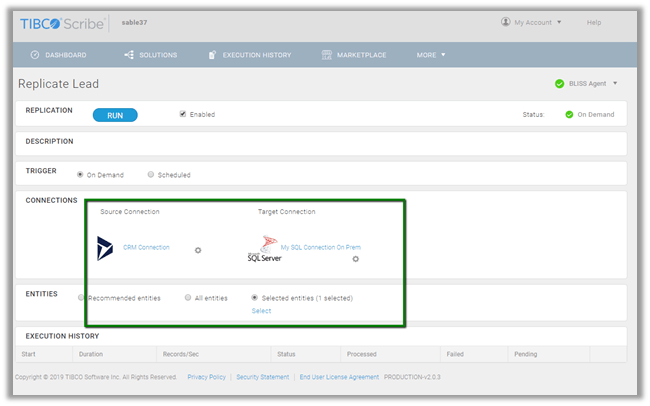
Interestingly enough the same limitation doesn’t exist in Scribe Online. Had posted something similar few days’ back on that

https://nishantrana.me/2019/01/14/scribe-online-working-with-hierarchical-data-in-dynamics-365-ce/

As we wanted to go with something that works in On Premise setup we went ahead with SSIS Productivity Pack of KingswaySoft https://www.kingswaysoft.com/products/ssis-productivity-pack which had XML components that works perfectly well with this kind of schema or structure.

Hope it helps..

Scribe Online – Working with Upsert Block in Dynamics 365 CE


Continuing our previous posts on Scribe Online, let us look at the Upsert block for Dynamics 365 CRM Connector.

The way it works is à

The Upsert block will have a field called alternatekeyname where we need to provide the name of the alternate key as shown below.

In CRM à

Along with passing the value for the field(s) involved in the alternate key.

The way to achieve the same in Informatica Cloud

https://nishantrana.me/2018/05/18/using-alternate-key-to-upsertupdate-using-dynamics-365-for-sales-connector-of-infomatica-cloud/

Do check out this wonderful article that explains the usage of Upsert Block, Custome Update + Insert and Update/Insert block.

https://www.scribesoft.com/blog/2014/11/updateinsert/

Hope it helps..

Scribe Online – Working with Hierarchical Data in Dynamics 365 CE


In the previous post, we saw how to create XML connection and using it as a source to create records in Dynamics 365 CE.

https://nishantrana.me/2019/01/11/scribe-online-xml-to-dynamics-365-ce/

In this post, we will see how to consume the hierarchical XML data as a source and create parent-child records in Dynamics 365 CE.

Suppose this is our source data with the following relationship

Contact à n Contract à n Asset à n Asset Line

As a first step we need to get the XSD for it, which we will use while defining the XML connection.

https://www.freeformatter.com/xsd-generator.html

Our XML connection

Similarly, add the CRM Connection.

This is how our final mapping will look like

For Query Contact Block (xml) à select Entity as Contact.

For the Include tab, we have selected all the child (tag) entities to be included.

For Create Contact (CRM) block we have mapped the first name and last name field

For For Each Child block select the relationship.

Followed by Create Contract block with following fields mapping.

Here we are setting the contact’s lookup in the contract entity using the Results from Contact Create steps.

Repeat the same steps for remaining child entities like Asset and Asset Line by selecting the relationship in for each child block and in the next create step setting the fields appropriately.

Validate and close the map and run the solution.

On successful run, we can see the records created in CRM

Hope it helps..

Scribe Online – XML to Dynamics 365 CE


Follow the earlier posts to create the Scribe Online trial and steps to create an integration solution.

Below is our sample XML file that holds the contact information that we want to create inside Dynamics 365 CE

For creating XML connection, we need the XSD file.

So let us generate the XSD file using the below tool

https://www.freeformatter.com/xsd-generator.html

The generated XSD –

Now install the XML Connector from the Marketplace.

Then create a new connection specifying the XML File and the XSD File.

Let us create the integration solution, go to Solution and click on create a new integration solution

Create a new integration map for the solution as shown below

Add the XML connection and the CRM Connection to the map and drag the Query block (XML Connection)

For Query Block select the contact entity.

The add the For Each Result block and insert the Create block (CRM) within it

For Create block, the select entity as Contact.

For the Fields tab, map the source fields to the target.

Click on ok to close the map editor and back in Solution, click on RUN to execute the solution.

After successful completion,

The success.xml created in the same folder where we had XML source file.

And also, we can see the records created in CRM.

In the next post, we will see how we can consume hierarchical XML data to create parent-child records in CRM.

Hope it helps..

Working with OptionSet \ Picklist in Scribe Online


Scribe Online makes it very easy to work with OptionSets while writing Integration and Replication solutions.

While creating the Dynamics 365 CE connection we can check the Include Picklist Display Names checkbox.

Scribe generates a corresponding field schemaname_displayname that holds the label for the corresponding option set.

Within our Query Block inside an integration type solution, we can see the display name fields added for each corresponding option set field.

Go to the Preview tab

Here we can see leadqualitycode_displayname, leadsourcecode_displayname etc. field added.

Within our Filter criteria, we can directly refer the label as shown below.

We can get the label from the Preview tab itself by clicking on the information icon next to the field as shown below instead of opening CRM.

Hope it helps..

Using Scribe Online Replication Services (RS) to replicate Dynamics CE Data


Scribe Online provides Replication Services that makes it extremely easy to replicate the data, schedule it and also includes auto-detection of changes.

Follow previous posts to create a free trial of scribe online and create a connection for SQL Server On-Premise and Dynamics 365.

Here we will be creating a Solution of type Replication.

Login to Scribe Online

https://app.scribesoft.com

In the Dashboard, select create new Replication option for the Solution.

Here for simplicity, we will be replicating Lead data to our SQL On-Premise database.

Specify CRM Connection for Source Connection and SQL On-Premise Database for the Target Connection

In Select Entities dialog box, we will be selecting the Lead entity.

This is how our replication solution looks like

Click on RUN to start the execution

Once it completes successfully, we can see the records processed, the duration it took and records inserted per seconds in the execution history.

Back in our Database, we can see the table created and all the leads record inserted

Here for option set and status fields we can see the _displayname field added that holds the corresponding display name for the option set’s value. This is governed through the connection properties.

Now let us run the solution again immediately.

We’d see no records processed.

Now let us create a new lead inside CRM and run the solution again.

We can see that record processed.

Now let us delete records from CRM and run it again. Here we have deleted 250 records.

We will see the 250 records processed and deleted from our table in the database as well.

Now let us update one of the lead records and run the solution again. On successful completion we can see 1 record updated by the solution.

Thus the replication services makes very efficiently manages the replication of the data considering all the scenario like create, update, delete.

Hope it helps..