Using Power Virtual Agent and Power Automate (Flow) to create a simple bot for Cases in Dynamics 365 for Customer Service


Here we will take a very simple example to see how Power Virtual Agent be used along with Power Automate to interact with Dynamics 365 model-driven App

Basically, the user enters the case number (ticketnumber) in the chatbot to get the current status of the Case.

To begin with,

  • Sign in / Sign up to create an account for Power Virtual Agents

https://powervirtualagents.microsoft.com/en-us/

  • Sign in with your work email address.
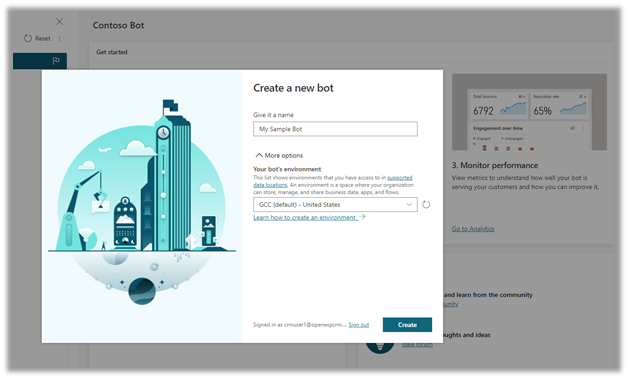
  • Name your bot and click on create.

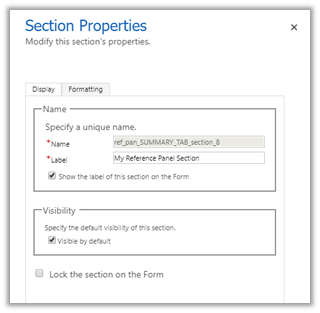
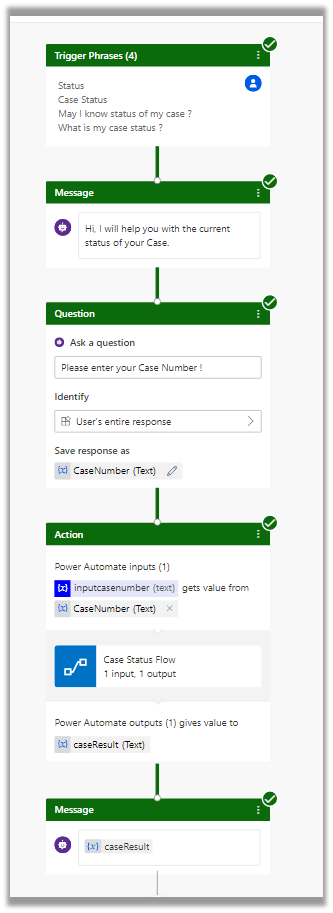
Create a new Topic with Name as Case Topic and Trigger phrases as shown below and save it.
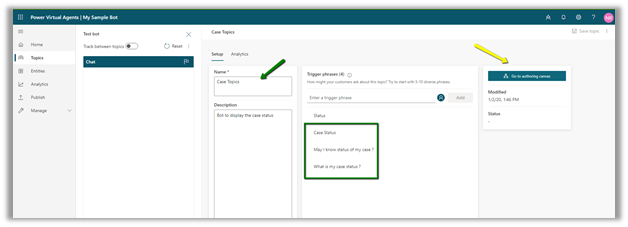
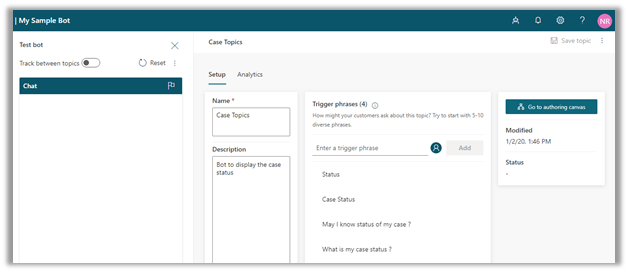
Click on Go
to authoring canvas

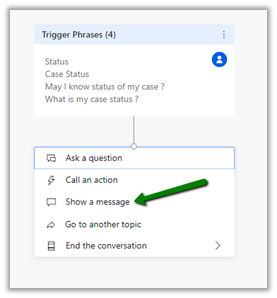
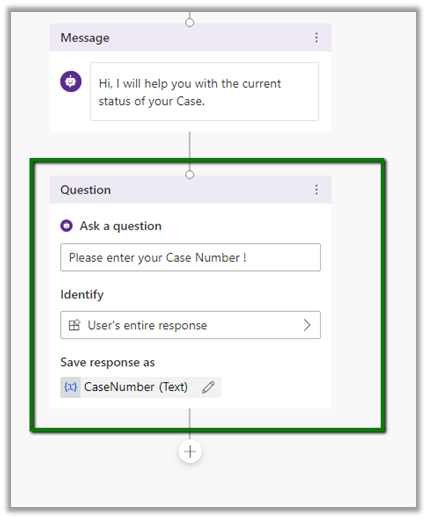
Add node Show a message


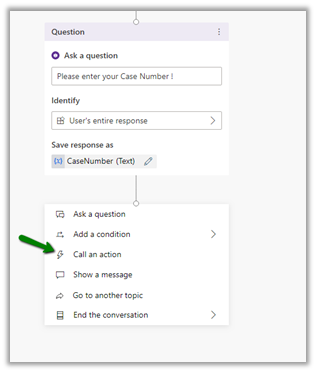
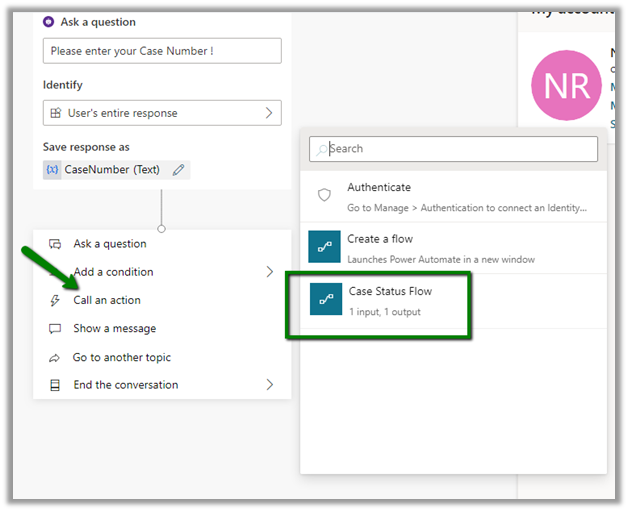
Next, add new “Ask a question” node, the bot will ask the user to enter the case number

Next, add a node “Call an action” to call the PowerAutomate (Flow)

Let us pause here and first author the Flow which we would be calling from this particular node.

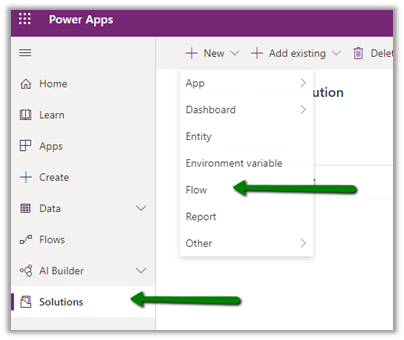
To create the Flow, login to PowerApps portal https://web.powerapps.com/, select the Virtual Agent environment, here we have created a new Solution and created a new Flow inside that solution.

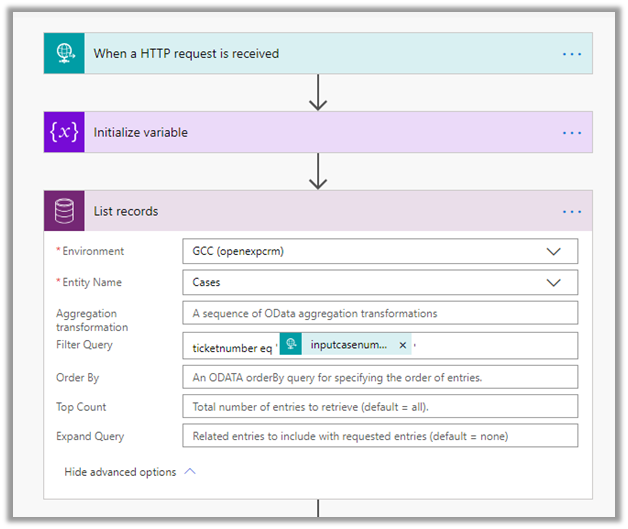
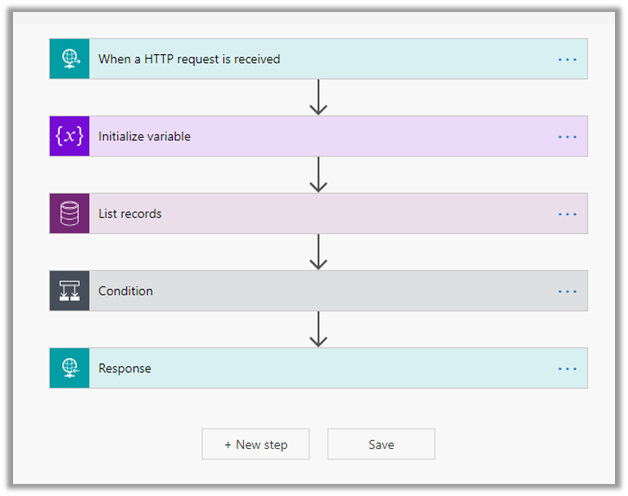
First add the trigger “When an HTTP Request is received” with the below request body, to take case number input from the user.

Then add Initialize Variable step, which will hold the output for the response.

Next, add the List records step to get the case’s status based on the case number.

Next add the condition step, for handling the scenario when the user enters the wrong case number.

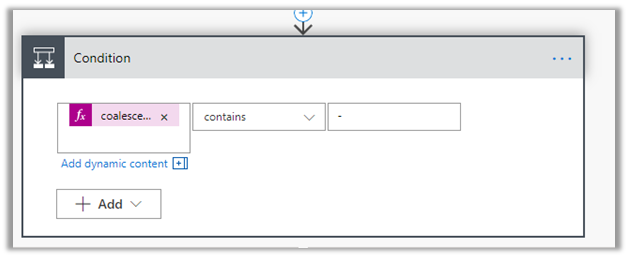
The expression used for the Condition step.

coalesce(body(‘List_records’)?[‘value’]?[0]?[‘ItemInternalId’],’NULL’)

The helpful posts

Next set the variable
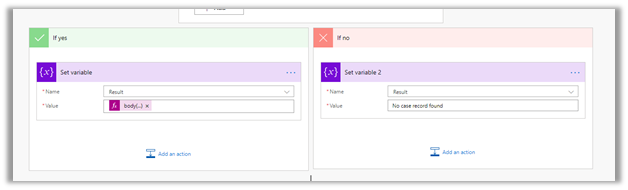
For If Yes à

Expression
à

body(‘List_records’)[‘value’]?[0]?[‘_statuscode_label’]

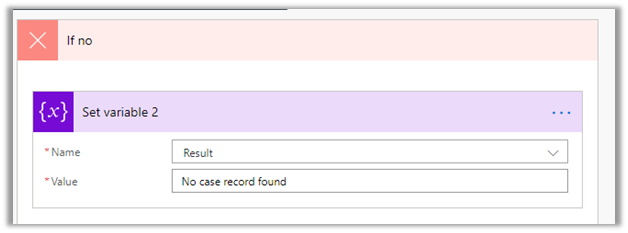
For If no, we are simple setting the value as “No case record found”

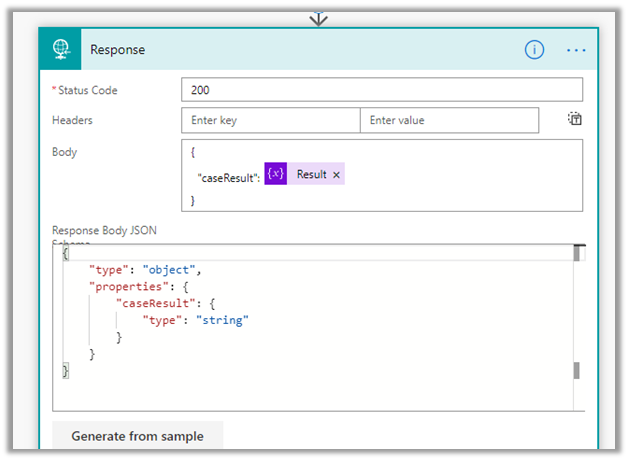
Lastly add the Response step, which returns the output through the variable.

The flow à

Save the Flow, and go back to authoring canvas of the Topic in the Power Virtual Agent.

Select the flow created in the Call an action node

Specify CaseNumber as the input

Select Show a message as the next node

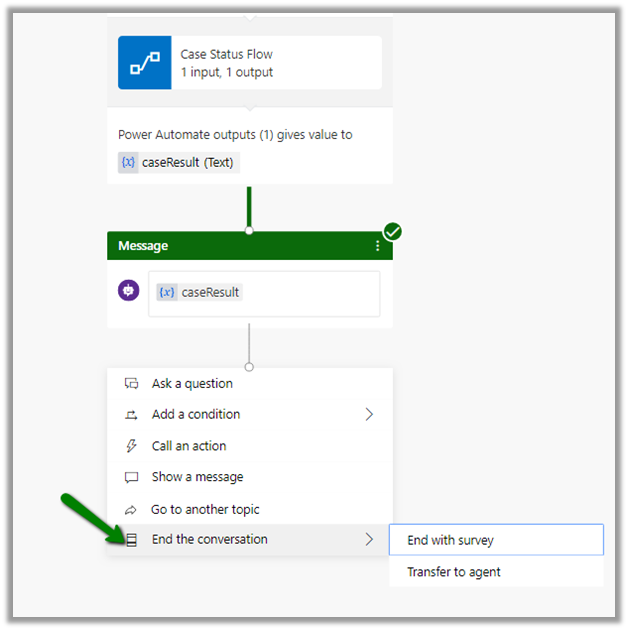
Specify caseResult output as the value to be used inside the Message

Save the dialog and now let us test it.

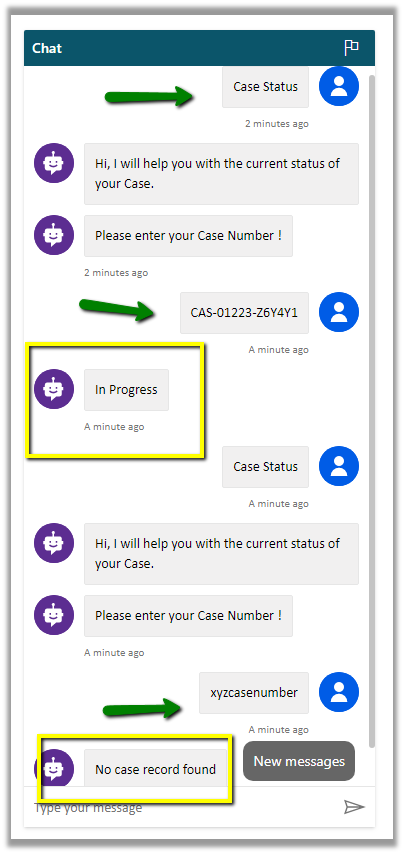
This is how the entire conversation logic looks like for our case topic.

We can also add End the conversation node to it.

Next, we will see how to publish and deploy this bot.


Hope it helps..

Advertisements

Dynamics 365 2019 release wave 2 blog posts


  • Customize Opportunity Close Dialog box

https://nishantrana.me/2019/11/22/customize-opportunity-close-dialog-box-dynamics-365-for-sales/

  • Lead related enhancements

https://nishantrana.me/2019/11/22/lead-enhancements-in-dynamics-365-for-sales-2019-release-wave-2/

  • Contextual Email Communication

https://nishantrana.me/2019/11/23/contextual-email-communication-in-dynamics-365-for-sales-2019-release-wave-2-unified-client/

  • Save and New button in Quick Create Form

https://nishantrana.me/2019/11/25/save-and-new-button-in-quick-create-form-2019-release-wave-2-unified-interface/

  • High Density Headers

https://nishantrana.me/2019/11/26/high-density-headers-in-dynamics-365-2019-release-wave-2-unified-interface/

  • Using Xrm.Navigation.navigateTo to open Web resources Modal or Inline.

https://nishantrana.me/2019/11/28/open-webresources-modal-or-inline-using-xrm-naviagtion-naviagteto-in-dynamics-365-unified-interface/

  • Business Card Scanner

https://nishantrana.me/2019/12/23/scan-business-cards-in-dynamics-365-for-sales-2019-release-wave-2-unified-interface/

  • Timeline and Grid control Enhancements

https://nishantrana.me/2019/12/24/timeline-and-grid-control-enhancement-in-dynamics-365-customer-service-2019-release-wave-2-unified-interface/

  • Lookup Filter, Error Notifications and Territory entity enhancements

https://nishantrana.me/2019/12/25/lookup-filter-error-notifications-territory-entity-enhancements-in-dynamics-365-for-sales-customer-service-2019-release-wave-2-unified-interface/

  • Knowledge management enhancements

https://nishantrana.me/2019/12/27/knowledge-management-enhancements-in-dynamics-365-for-customer-service-2019-release-wave-2/

  • Product related enhancements

https://nishantrana.me/2019/12/28/opportunity-quote-order-invoice-product-related-enhancements-in-dynamics-365-for-sales/

  • The helpful resources: –

https://www.youtube.com/playlist?list=PLcakwueIHoT8-FSLxr5-3pprKWFHFMv3N

https://docs.microsoft.com/en-us/dynamics365-release-plan/2019wave2/


Reference Panel section for Forms in Dynamics 365


With the reference panel section, users can move across the different grid and quick view control that are part of it at a single place instead of scrolling.

  • Reference Panel is a new type of section that can be added on form.

  • Only one reference panel can be added per form.

  • It is a single column section.

  • Multiple Sub-grid and Quick View control can be added to it.

Make sure to apply the appropriate icon.

  • The default tab will be the first control added.

  • The other tab will follow the same order in which they are added.

More on sections

https://bit.ly/2MCPL3E

https://www.youtube.com/watch?v=ubEIAgKFzLo

Hope it helps..

Advertisements

Opportunity/Quote/Order/Invoice Product-related enhancements in Dynamics 365 for Sales


Below are some of the features added in the Opportunity/Quote/Order/Invoice products for the users to improve their experience.

If we try adding a new product line item without specifying the price list we will get the pop-up message box that asks us to specify the price list.

To override this behavior,

Go to Product Catalog Settings and set Price list optional and click on Apply as below.

This time it opens the opportunity line form on click of Add Product Line Item.

For legacy web client, the same setting can be defined at Sales tab of System Settings dialog box à

We can also “Save and Create New” option on the Quick Create form of the product line item to quickly add the multiple product line items.

Make sure to enable “Allow Quick Create”.

Save & Create New à

Users can now quickly view and edit properties for a product as shown below.

Edit Properties à

Get all the details here

http://tiny.cc/j0n3hz

http://tiny.cc/z0n3hz

Hope it helps..

PackageDeployerWrapper: Import operation time out exception while trying to create a new organization in Dynamics 365 Customer Engagement (On-Premise)


Recently for one our projects,

where had Dynamics CRM On-Premise already installed by the IT team quite sometime back, when we tried create a new organization through Deployment Manager, we got the below error

“Create new Organization (Name=46d256f4-1009-ea11-a2df-00505680070e, Id=FABUAECIBSIT) failed with Exception: System.Exception: Error.ActionFailed Microsoft.Crm.Tools.Admin.InstallPlatformSolutionsAction —> Microsoft.Crm.PackageDeployment.PackageDeployerException: Package BaseCustomControlsCore failed to install on attempt 1. System.AggregateException: One or more errors occurred. —> Microsoft.Crm.MultiTenantPackageDeployment.PackageDeployerException: PackageDeployerWrapper: Import operation timed out. at Microsoft.Crm.MultiTenantPackageDeployment.PdExecutor.Process(PackageDeploymentInputArgs input, JobOutput`1 output, CancellationToken ct) at System.Threading.Tasks.Task.Execute()

— End of inner exception stack trace —

—> (Inner Exception #0) Microsoft.Crm.MultiTenantPackageDeployment.PackageDeployerException: PackageDeployerWrapper: Import operation timed out. at Microsoft.Crm.MultiTenantPackageDeployment.PdExecutor.Process(PackageDeploymentInputArgs input, JobOutput`1 output, CancellationToken ct) at System.Threading.Tasks.Task.Execute()<-”

After trying out all the different permutations and combinations (network things, cleaning and setting up the infra etc.), the way it got resolved was by installing the latest cumulative update.

https://support.microsoft.com/en-ae/help/3142345/microsoft-dynamics-365-onpremise-cumulative-updates

https://support.microsoft.com/en-us/help/4521749/service-update-0-10-for-microsoft-dynamics-365-9-0

The reason we applied and went for the cumulative updates options as the last one, because, we had our production in the older version and because of multiple constraints we were not planning to upgrade our production server.

Fortunately, the solution from version 9.0.10.10 got imported successfully in production Dynamics CRM organization that were in version 9.0.2.x.

Hope it helps..

Lookup Filter, Error Notifications, Territory entity enhancements in Dynamics 365 for Sales / Customer Service – 2019 Release Wave 2 (Unified Interface)


Let us look at some other enhancements added as part of 2019 Release Wave 2 in the product.

Lookup filter enhancement

The lookup filter on searching for a specific term will show the different types of record (entity) that are there in the results for filtering. T

This allows the user to easily find the record.


Here on selecting Contact, it will display only the contact records matching the search criteria.


Similarly, Regarding field lookup in Activity à

Will allow filtering based on the type of records found matching the criteria.

Navigate to error in the form from the navigation bar

The navigation bar shows the errors in the form

Click on the error and it will take us to that particular field without us to figure out the field in the form.

  • Hierarchical relationship support on the Territory Entity

Territory entity now supports Hierarchy.

Hope it helps..