Creating a custom Weather Web Part in SharePoint 2010


Update :- The below solution doens’t work any more

http://www.tropicdesigns.net/blog/weather-com-suddenly-cancels-their-free-xml-data-feed-for-developers/


Recently we had a requirement to create a web part that will show the weather information based on the address of the user, which we were pulling from Microsoft Dynamics CRM’s database.

These following two links were of immense help

http://svintinner.blogspot.com/2007/02/how-to-use-weathercom-to-replace-msnbc.html

http://weatherwebpart.codeplex.com/

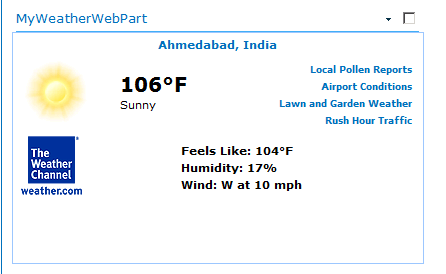
This is how the web part looks

Below is the sample source code for the web part

public class MyWeatherWebPart : WebPart
{
String UserLocation = "Ahmedabad"; // user city
String UserCountry = "India"; // user country
String RequestforURL = string.Empty; // URL which use to get xml data ( rss feed response ) from weather.com
System.Web.UI.WebControls.Xml xmlResults = new System.Web.UI.WebControls.Xml(); // this object contain final data we need to publish(write on sharepoint site)

protected override void Render(HtmlTextWriter writer)
{
try
{
String reqUrl = "<a href="http://xoap.weather.com/weather/local/">http://xoap.weather.com/weather/local/</a>" + GetLocaleID() + "?cc=*&dayf=5&link=xoap&prod=xoap&par=xxxxxxxx&key=xxxxxxxxxxxxxxx";
HttpWebRequest wr = (HttpWebRequest)WebRequest.Create(reqUrl);
//load the response into a response object
WebResponse resp = wr.GetResponse();
// create a new stream that can be placed into an XmlTextReader
Stream str = resp.GetResponseStream();
XmlTextReader reader = new XmlTextReader(str);
reader.XmlResolver = null;
// create a new Xml document and locading feed data in to it
XmlDocument doc = new XmlDocument();
doc.Load(reader);

// as xml style sheet is use for publishing data so we loading it into envornment
HttpContext context = HttpContext.Current; // getting refrence of current environment
// getting reference of path where sml style sheet stays
string path = context.Request.MapPath("/_layouts/RSSWeatherXSL.xsl");

// this object need to convert xml data into xml style sheet view
XslTransform trans = new XslTransform();

trans.Load(path); // loading xsl file
xmlResults.Document = doc; // loading xml data
xmlResults.Transform = trans; // transforming xml to xsl
xmlResults.DataBind(); // binding data
xmlResults.Visible = true; // setting property
xmlResults.RenderControl(writer); // rendering/publishing data as html

}
catch (Exception ex)
{
writer.Write(ex.Message);
}

}
/// <summary>
///   GetLocaleID() THIS METHOD USED TO GET LOCATION ID WHICH we NEED TO GET WEATHER RSS FEED
/// THIS METHOD USE USER CITY AND COUNTRY INFORMATION
/// </summary>
/// <returns></returns>
public string GetLocaleID()
{
try
{
RequestforURL = "<a href="http://xoap.weather.com/search/search?where">http://xoap.weather.com/search/search?where</a>=" + UserLocation.ToString() + "," + UserCountry.ToString();
// First we request our content from our provider source .. in this case .. The Weather Channel
HttpWebRequest wr = (HttpWebRequest)WebRequest.Create(RequestforURL);
//load the response into a response object
WebResponse resp = wr.GetResponse();
// converting it into stream
Stream str = resp.GetResponseStream();
// creating xml reader
XmlTextReader XmlTextReader = new XmlTextReader(str);
XmlTextReader.XmlResolver = null;
XmlDocument doc = new XmlDocument();
// loading xml data in xml doc
doc.Load(XmlTextReader);
// searching location id
return doc.DocumentElement.ParentNode.LastChild.FirstChild.Attributes[0].Value;
}
catch(Exception ex)
{
throw ex; // any exception then default value i.e toronto, canada
}
}
}

Bye.

Creating a custom Virtual Earth Web Part in SharePoint 2010


I had a requirement to create a web part that will pull the address information from one of the records in CRM and show it on the map.

One of the issues I faced while trying out different approaches was that after adding the web part to the SharePoint page, the scrollbar used to go missing in that page.

Finally with help of below two links I managed to develop a the web part.

http://sundium.wordpress.com/2008/06/15/dynamics-crm-40-virtual-earth/

http://virtualearthwebpart.codeplex.com/

Well we could make use of the below code to achieve that

public class MyVirtualEarthWebPart : WebPart
{
protected override void OnLoad(EventArgs e)
{
System.Web.UI.ClientScriptManager csm = Page.ClientScript;
StringBuilder builder = new StringBuilder();
string SCRIPT_NAME = "MapScript" + this.ID;

builder.Append("<meta http-equiv=\"Content-Type\" content=\"text/html; charset=utf-8\"> \n");
builder.Append("<script type=\"text/javascript\" src=\"http://dev.virtualearth.net/mapcontrol/mapcontrol.ashx?v=6.2\"></script> \n");
builder.Append("<script type=\"text/javascript\"> \n");
builder.Append("    var map = null; \n");
builder.Append("    var latitude = null; \n");
builder.Append("    var longitude = null; \n");
builder.Append("    var address = ''; \n");
builder.Append("    var titles = new Array(); \n");

builder.Append("    function GetMap() \n");
builder.Append("    { \n");
builder.Append("        try  \n");
builder.Append("        { \n");
builder.Append("            address = 'New C G Road, chandkheda, gandhinagar';\n");
builder.Append("            map = new VEMap('myMap');\n");
builder.Append("            map.LoadMap(null,4,VEMapStyle.Hybrid); \n");
builder.Append("            map.Find(null,address,null,null,0,10,true,true,true,true,FindCallBack); \n");
builder.Append("        } \n");
builder.Append("        catch (e) \n");
builder.Append("        { \n");
builder.Append("            alert('GetMap: ' + e.message); \n");
builder.Append("        } \n");
builder.Append("    } \n");

builder.Append("    function FindCallBack(shapeLayer, results, positions, moreResults, e) \n");
builder.Append("    { \n");
builder.Append("        try  \n");
builder.Append("        { \n");
builder.Append("             if(positions != null && positions.length > 0) \n");
builder.Append("              { \n");
builder.Append("                PlacePushPin(positions[0].LatLong.Latitude,positions[0].LatLong.Longitude); \n");
builder.Append("                latitude = positions[0].LatLong.Latitude; \n");
builder.Append("                longitude = positions[0].LatLong.Longitude; \n");
builder.Append("               } \n");
builder.Append("        } catch (e) { \n");
builder.Append("            alert('FindCallBack: ' + e.message); \n");
builder.Append("        } \n");
builder.Append("      }      \n");

builder.Append("    function PlacePushPin(lat, lon){ \n");
builder.Append("                latlong = new VELatLong(lat,lon); \n");
builder.Append("                customerPushPin = new VEShape(VEShapeType.Pushpin,latlong); \n");
builder.Append("                customerPushPin.SetTitle(address); \n");
builder.Append("                map.AddShape(customerPushPin); \n");
builder.Append("                map.SetCenterAndZoom(latlong,15);  \n");
builder.Append("                } \n");

builder.Append("_spBodyOnLoadFunctionNames.push('GetMap'); \n</script> \n");
csm.RegisterClientScriptBlock(
this.GetType(),
SCRIPT_NAME,
builder.ToString(),
false);

}
protected override void CreateChildControls()
{
base.CreateChildControls();
StringBuilder builder = new StringBuilder();
builder.Append("<div id='myMap' style='position: relative; width: 300px; height: 300px;'></div>");
this.Controls.Add(new LiteralControl(builder.ToString()));
}
}

Bye.

Configuring Forms Based Authentication (FBA) for SharePoint 2010


Create a new web application from Central Administration.

Select Authentication as Claims Based Authentication

Check Enable FBA checkbox and specify Membership provider name and role manager name as SqlMembers and SqlRoles.

Click on Ok to create the web application.

After successful creation of the web application create a site collection.

Navigate to C:\Windows\Microsoft.NET\Framework64\v2.0.50727 and run aspnew_regsql.exe tool there.

Follow the screen shots below to create a new database named MYFBADB.

After successful creation of the database add the following information(highlighted in yellow) to the web.config file of our FBA application

<membership
defaultProvider=i>

<providers>

<add
name=i
type=Microsoft.SharePoint.Administration.Claims.SPClaimsAuthMembershipProvider, Microsoft.SharePoint, Version=14.0.0.0, Culture=neutral, PublicKeyToken=71e9bce111e9429c />

<add
connectionStringName=SqlConn
applicationName=/
name=SqlMembers
type=System.Web.Security.SqlMembershipProvider, System.Web, Version=2.0.3600.0, Culture=neutral, PublicKeyToken=b03f5f7f11d50a3a
minRequiredPasswordLength=5
minRequiredNonalphanumericCharacters=0 />

</providers>
</membership>

<roleManager
defaultProvider=c
enabled=true
cacheRolesInCookie=false>
<providers>
<add
name=c
type=Microsoft.SharePoint.Administration.Claims.SPClaimsAuthRoleProvider, Microsoft.SharePoint, Version=14.0.0.0, Culture=neutral, PublicKeyToken=71e9bce111e9429c />

<add
connectionStringName=SqlConn
applicationName=/
name=SqlRoles
type=System.Web.Security.SqlRoleProvider, System.Web, Version=2.0.3600.0, Culture=neutral, PublicKeyToken=b03f5f7f11d50a3a />

</providers>
</roleManager>
</SharePoint>
<connectionStrings>
<add
name=SqlConn
connectionString=server=crm2011;database=MYFBADB;Trusted_Connection=true />
</connectionStrings>
<system.web>

Next open the web.config of the Central admin site and add the same information added above

<roleManager
enabled=true
defaultProvider=AspNetWindowsTokenRoleProvider>
         <providers>
             <add
connectionStringName=SqlConn
                 applicationName=/
                 name=SqlRoles
                 type=System.Web.Security.SqlRoleProvider, System.Web, Version=2.0.3600.0, Culture=neutral, PublicKeyToken=b03f5f7f11d50a3a/>
         </providers>
     </roleManager>

         <providers>
             <add
connectionStringName=SqlConn
                 applicationName=/
                 name=SqlMembers
                 type=System.Web.Security.SqlMembershipProvider, System.Web, Version=2.0.3600.0, Culture=neutral, PublicKeyToken=b03f5f7f11d50a3a />
         </providers>     </membership>

</SharePoint>
    <connectionStrings>
        <add
name=SqlConn
connectionString=server=crm2011;database= MYFBADB;Trusted_Connection=true />

    </connectionStrings>    
<system.web>

Lastly add the following configuration information in the web.config file of the SecurityTokenServiceApplication (C:\Program Files\Common Files\Microsoft Shared\Web Server Extensions\14\WebServices\SecurityToken)

    </system.net>
    <connectionStrings>
        <add
name=SqlConn
connectionString=server=crm2011;database= MYFBADB;Trusted_Connection=true />
    </connectionStrings>    <system.web>
        <membership
defaultProvider=SqlMembers>
            <providers>
                <add
connectionStringName=SqlConn
applicationName=/
name=SqlMembers
type=System.Web.Security.SqlMembershipProvider, System.Web, Version=2.0.3600.0, Culture=neutral, PublicKeyToken=b03f5f7f11d50a3a />
            </providers>
        </membership>
        <roleManager
enabled=true
defaultProvider=SqlRoles>
            <providers>
                <add
connectionStringName=SqlConn
applicationName=/
name=SqlRoles
type=System.Web.Security.SqlRoleProvider, System.Web, Version=2.0.3600.0, Culture=neutral, PublicKeyToken=b03f5f7f11d50a3a/>
            </providers>
        </roleManager>
    </system.web>

That’s it.

Adding User to SharePoint Group through a custom ASP.NET web service.


I had a requirement to create a web service which would be used to add user to a SharePoint group. The code for it

[WebMethod]
public  string AddSharePointUser(string username,string password, string email){
string statusInfo = “”;
try
{
s
tring SharePointUrl = ConfigurationManager.AppSettings[“SharePointUrl”].ToString();
string SharePointGroup = ConfigurationManager.AppSettings[“SharePointGroup”].ToString();

SPSecurity.RunWithElevatedPrivileges(delegate()
{
using (SPSite oSiteCollection = new
SPSite(SharePointUrl))
{
oSiteCollection.AllowUnsafeUpdates = true;
using (SPWeb oWebsite = oSiteCollection.OpenWeb())
{
oWebsite.AllowUnsafeUpdates = true;
SPUser spUser = oWebsite.EnsureUser(username);

SPGroup spGroup = oWebsite.SiteGroups[SharePointGroup];

spGroup.AddUser(spUser);
oWebsite.AllowUnsafeUpdates = false;

}

oSiteCollection.AllowUnsafeUpdates = false;

}});

statusInfo = “User Created Successfully”;

}
else
{
statusInfo = “User Already Exists”;

}}
catch (Exception ex)
{
statusInfo = ex.Message;

}
return statusInfo;

}

To run the web service successfully, we need to set the identity of application pool of the web service to SharePoint Administrator account.

Hope it helps.

Using Change Password ASP.NET control in SharePoint 2010 FBA.


Create a new SharePoint 2010 Empty Project in visual studio 2010.

Right click the project à Add New Itemà Select “Application Page”.

Add the ChangePassword control inside PlaceHolderMain content place holder

<asp:Content ID=”Main” ContentPlaceHolderID=”PlaceHolderMain” runat=”server”>

<asp:ChangePassword
id=”myChangePassword”
newpasswordregularexpressionerrormessage=”Error: Your password must be at least 5 characters long, and contain at least one number and one special character.” runat=”server” CancelDestinationPageUrl=”~/pages/default.aspx” OnContinueButtonClick=”ContinueClickHandler” MembershipProvider=”SqlMembers”  OnChangingPassword=”ChangingPassword” OnChangedPassword=”ChangedPassword”></asp:ChangePassword></asp:Content>

Put the following code for OnChangingPassword and OnChangedPassword Event handler in the code behind. 

 // the username would be in the following format
 // 0#.f|sqlmembers|nishantr
 // so we need to get only the username part
 // otherwise it wont work properly
protected void ChangingPassword(object sender, EventArgs e)
{
System.Web.UI.WebControls.ChangePassword chngPassword = (System.Web.UI.WebControls.ChangePassword)sender;
chngPassword.UserName = chngPassword.UserName.Substring(chngPassword.UserName.LastIndexOf("|") + 1);
}

// add reference to Microsoft.SharePoint.IdentityModel dll
protected void ChangedPassword(object sender, EventArgs e)
{
System.Web.UI.WebControls.ChangePassword chngPassword = (System.Web.UI.WebControls.ChangePassword)sender;
FormsAuthentication.SignOut();
Microsoft.SharePoint.IdentityModel.SPClaimsUtility.AuthenticateFormsUser(new Uri(SPContext.Current.Web.Url), chngPassword.UserName, chngPassword.NewPassword);
}


Check this really helpful pack

http://sharepoint2010fba.codeplex.com/

Hope it helps.

Add reference to Microsoft.SharePoint.IdentityModel.dll


Had trouble finding the above assembly to add reference to it. It wasn’t there in the 14 hive. The location where we can find it is

C:\Windows\assembly\GAC_MSIL\Microsoft.SharePoint.IdentityModel\

Bye.