CDS List Records Filter Query using Flow


Thomas Sandsør's avatarCRM Keeper

This week I needed to use the List Records function, and I realized that I had no idea how to use the filters. Thank you Jonas Rapp for creating the FetchXML Builder!! The function “Flow List parameters” saved my day:)

Simple filters

Let’s begin with the simple filters where I get a contact with the last name of Sandsør

Test your search result with the Execute button so see that anything is actually returned. Then open the Flow List Parameters

The tool converts the Fetch XML, and magically gives the correct filter to add in our FLOW query. It can’t get much simpler than that!!

Lookups

Lookups act a little bit different with the syntax, as lookups always to. This got me quite confused before finding this tool, because I was not getting match to my result.

I am searching for contacts with a given GUID. In my case I…

View original post 186 more words

Call Azure Function from Dynamics 365 CRM using Webhooks


Interesting read !

priyeshwagh777's avatarD365 Demystified

This is a vast topic to cover in a blog. But I wanted to write from a bird-eye’s view of how this will pan out in an implementation where you perform a certain operation in Dynamics 365 CRM and an Azure Function is called to perform further operations.

This post is written keeping in mind fair knowledge of Azure Functions, Storage accounts and subscriptions in mind.

I’ll try to keep the article short, so stay with me! 🙂

Create a Function App in Azure

  1. Let’s say you have created a Function App in Azure already and want to connect to Dynamics 365 CRM. Click on the big + New Function button in the screenshot below
    resourceOverview_LI
  2. Now, since I want to keep Visual Studio as my driver for coding and deployment, I’ll create a new Project in Visual Studio of type Azure Functions and click Next
    newProj
  3. On the next page, I’ll…

View original post 560 more words

Approvals in Power Automate and Dynamics 365


Let us try implementing a basic scenario, where an agent can send a case for approval and the record is updated based on the approver’s response.

Check other posts on Approvals – https://nishantrana.me/2020/08/31/approvals-power-automate-dynamics-365/

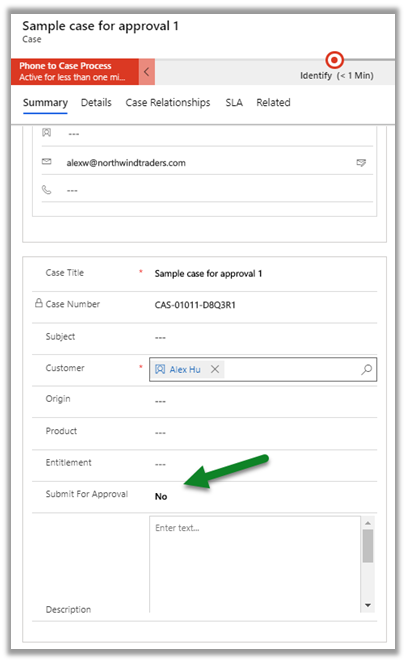
The agent here sets the Submit for Approval – custom field as Yes and saves the record for submitting it for approval.

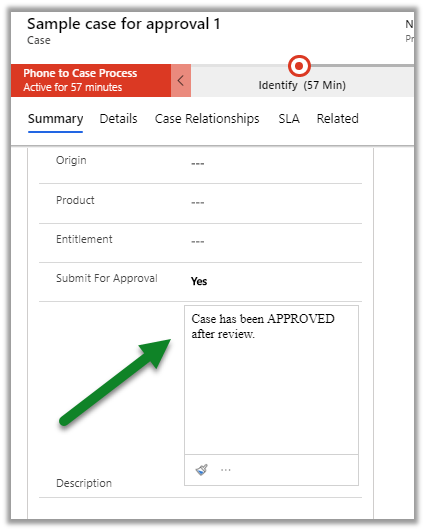
The description field will be updated to reflect approval or rejection.

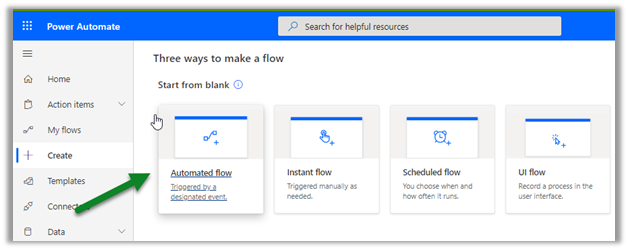
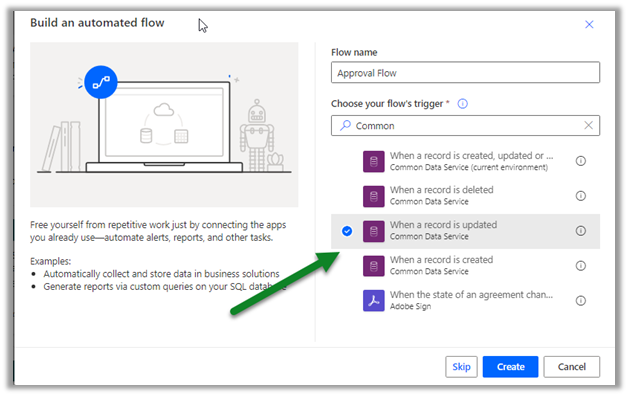
Login to Power Automate

https://flow.microsoft.com/

Start with Automated Flow (blank template)

Choose trigger as When a record is updated. (Common Data Service)

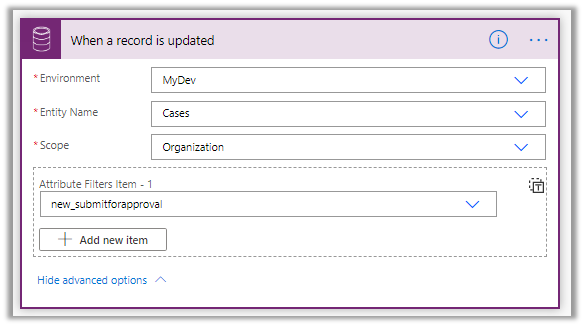
Select the appropriate environment, cases as entity name, and scope, for attribute filter, we have selected the custom field ‘submit for approval’

Add a new step and search for Approvals action.

Select approval type as Start and wait for an approval and specify the appropriate values.

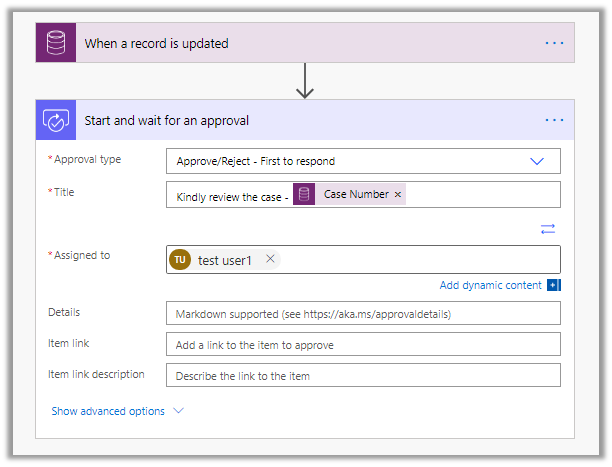
To Item link with the URL of the case record

https://nishantrana.me/2020/08/25/add-url-of-record-in-item-link-in-approval-power-automate-dynamics-365/

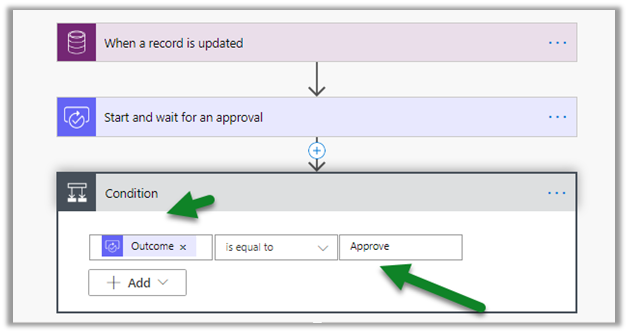
Save the flow and add a Condition step with the condition ‘Outcome’ equal to ‘Approve’.

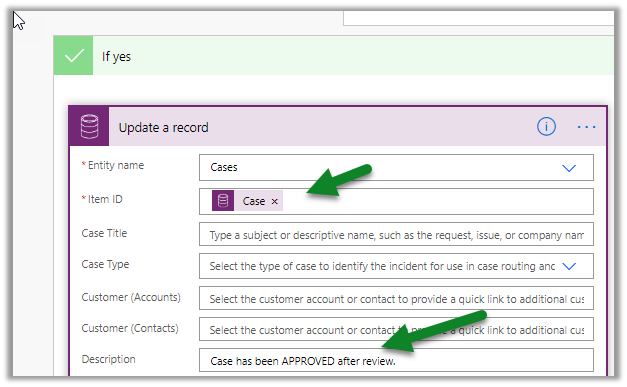
For If Yes step, select Update a record (Common data service) action, specify values for Entity name, Item ID, and Description field.

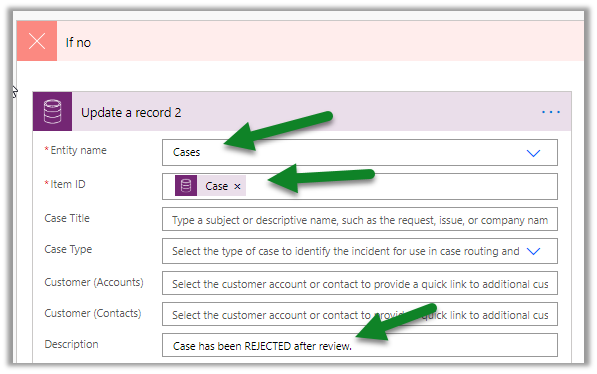
Repeat the same for the If no step.

Update – add the condition to check the value of submit for approval field

IfCondition

As we will request for approval only if value is true.

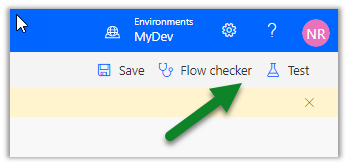
Let us select the Flow checker to check the flow first before we can test it.

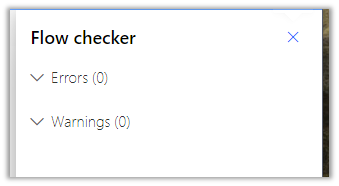
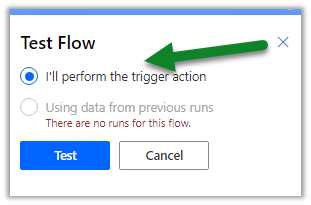
As there are no errors or warnings, click on the Test button and select the I’ll perform the trigger action option.

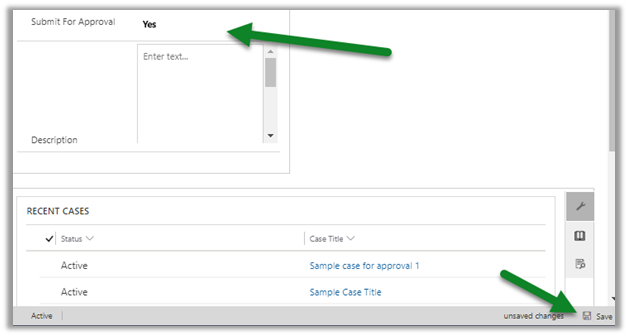
To trigger it, open a case record, set Submit for approval field as Yes, and save it.

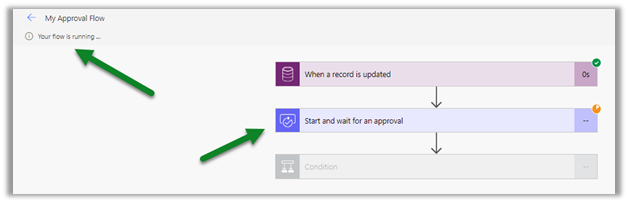
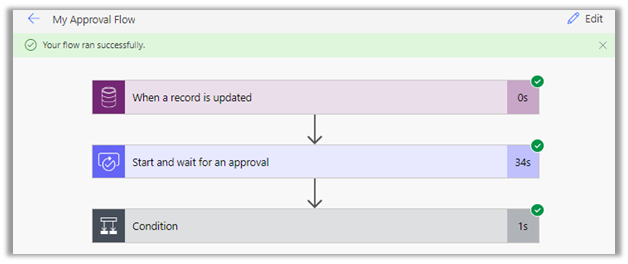
We’d see our flow running and waiting for the approval.

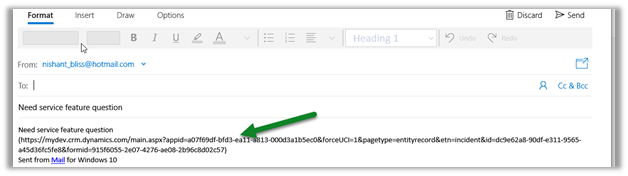
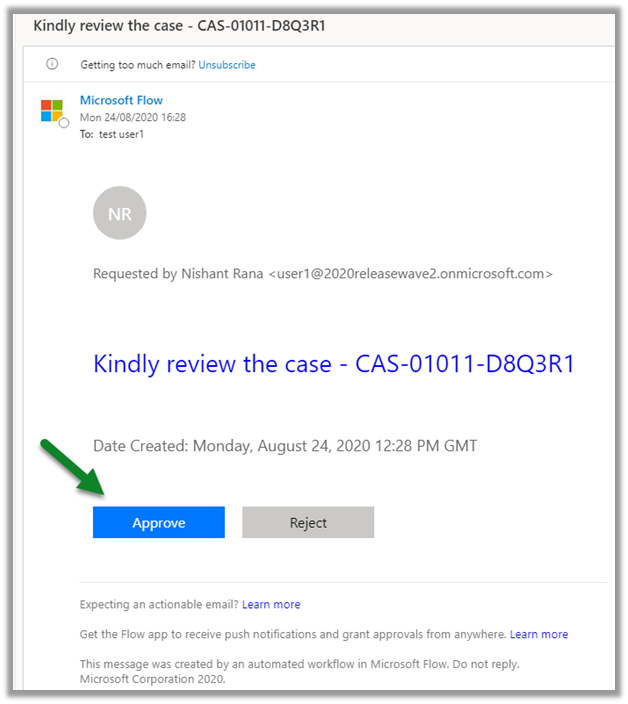
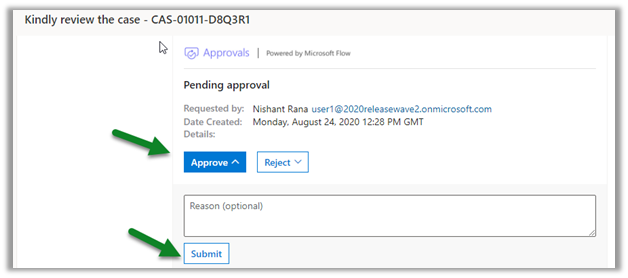
The approver can either approve it through email.

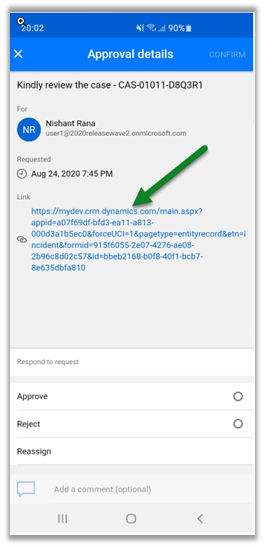
Or within the mobile app.

https://aka.ms/flowmobilediscoverabilitybanner

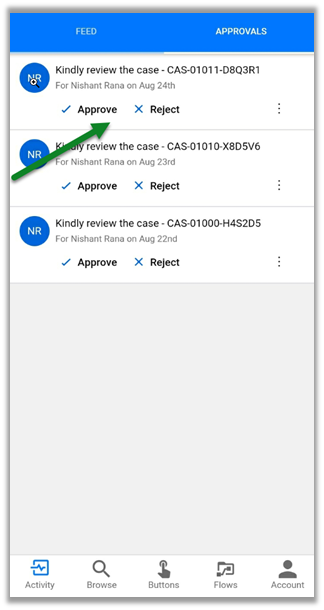
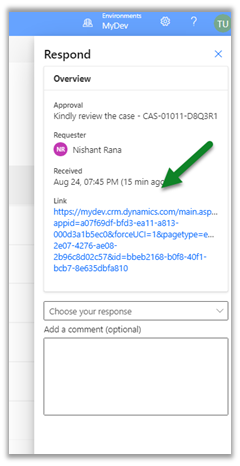
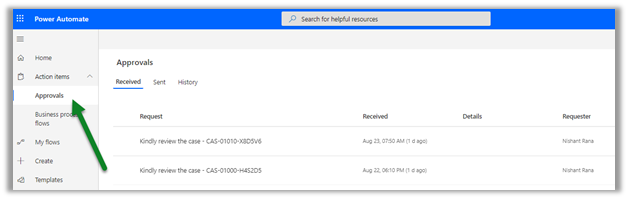
As well as the approval center.

Let us approve the request.

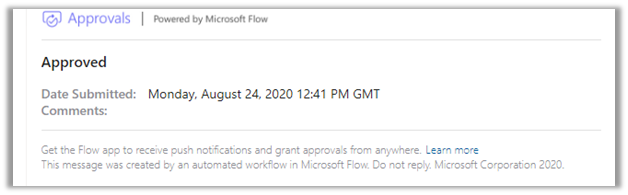
We’d see our flow completed successfully.

And the case record updated.

This was the very basic example to begin with, in the next few posts we’d try covering other scenarios.

Hope it helps..

Advertisements

How to – Add URL of record in Item link in Approval – Power Automate / Dynamics 365


To add the record’s URL in the Item link in the approval step within Power Automate, we can follow the below steps

First, to get the URL, open the record, click on Email a link

Copy the URL from the mail editor

Or get the Record URL using our favorite tool for Dynamics 365 / CRM

https://github.com/rajyraman/Levelup-for-Dynamics-CRM

Paste the URL and specify the id (guid)  part as shown below.

Link within Email

Inside Approval Center

Within the app

Another option could be to create a custom field in the entity to hold the URL and use the same for the Item link.

Check our the below posts for more details à

https://diyd365.com/2019/11/27/populating-item-link-in-approvals-power-automate-ms-flow/

https://www.d365geek.co.uk/single-post/2018/11/05/Microsoft-Flow-Vs-Dynamics-365-Workflows—Part-1

https://learningrefresh.home.blog/2019/04/08/create-first-microsoft-flow/

https://powerusers.microsoft.com/t5/Building-Flows/Dynamics-365-Get-URL-dynamically-in-flow/td-p/153813

http://linnzawwin.blogspot.com/2020/01/power-automate-find-out-how-to-include.html

Hope it helps..

Advertisements

Solved – Your subscription is no longer active. Please contact your admin to activate your subscription while accessing Outlook Office 365


While trying to access Outlook Office 365 one of the users was getting the below error.

https://outlook.office.com/

Exchange online licenses were assigned to the user, and also the other users were not facing this issue.

As suggested in one of the forums, we tried re-assigning the license.

https://admin.microsoft.com/AdminPortal/Home#/subscriptions

i.e. Unassign and reassign the license to the user.

We kept getting the issue (even after trying in different browsers and also in in-private browsing).

We tried the same after 1 hour or so and the user was able to access the outlook office 365, seems like the change takes time to propagate.

So the key is to make sure the licenses are active and appropriately assigned and followed by a little bit of patience.

Hope it helps..

Advertisements

Configure Customer Service Analytics and Insights in Dynamics 365 Customer Service Hub (Preview)


With the recent updates, the Analytics and Insights that were earlier only available inside Customer Service Insights and Customer Service Analytics for Dynamics 365 in Power BI are now accessible from within the Customer Service Hub.

Navigate to the Service ManagementAnalytics and Insights – Settings (preview) section inside Customer Service Hub to enable it.

Toggle the Enabled option to enable Analytics reporting.

The reports can be viewed from Reports (preview) – Service Area

To enable Insights, click on Get Started.

It will perform a check for the license before setting things up.

We’d get the below error if the license is missing.

To get the license, log in to the admin portal.

https://admin.microsoft.com/

For Purchase Services, select Dynamics 365 Customer Service Insights.

Enable the trial.

Assign the license to the user.

This time the configuration will be successful.

Clicking on View reports will open the reports.

We have the option to share, configure it, and to open it inside the Customer Service Insights app.

  • Both the reports and insights are accessible from Service Area the Customer Service Hub

AS

Get all the details here

https://docs.microsoft.com/en-gb/dynamics365/customer-service/introduction-customer-service-analytics

Hope it helps..